When I started taking photos, I hated shooting at low speeds. Mi images were blurry, distorted, and useless. Of course, by that time I was 10 and I didn’t even think about using a tripod. Even today, carrying a tripod is something that annoys me (a lot), but I have learnt to live with it. Because if there is something that drives me crazy about photography is being able to capture movement in a single image. And this is why I am writing this long exposure photography guide.
I dare to say that if you ask if it is possible to capture movement in photography, some people will doubt, and some will say no. However, this is why long-exposure photography won my heart. I was able to capture movement, motion, things happening, just using my camera.
My first long exposures were terrible. Blurry, forcing my camera into way too high focal numbers,… By that time I would have loved to read a guide that not only told me about how to take long-exposure images but also how to avoid the beginner’s mistake I made (and let’s be honest, I still commit some of them).
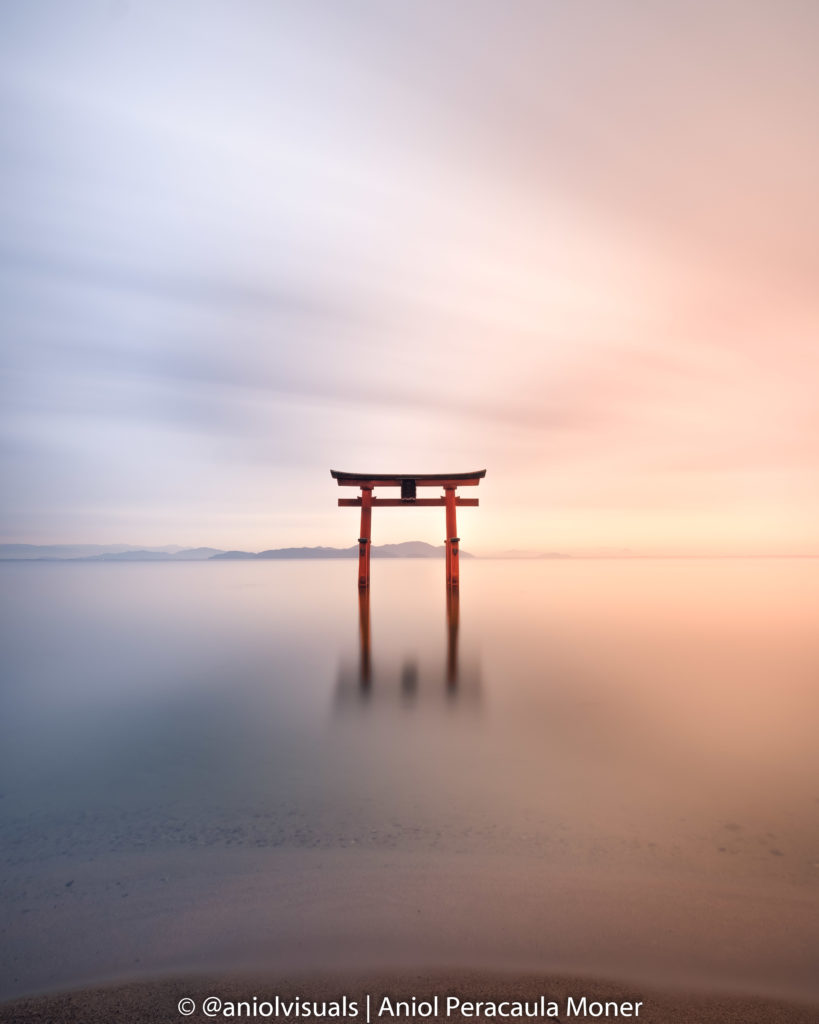
Would you like to know how to take photos like this one? Keep reading!
Gear for long-exposure photography
Well, taking long-exposure images requires a bit more gear than other areas of photography. Not all of the following elements are 100% necessary, but having all of them will make things easier.
1. Camera
Yes, of course, who would forget its own camera when going out to take photos? Here, the better the camera, the easier it will be to get nice results. A good body, with a good sensor, are always handy when going out to take landscape photography.
2. Lenses
This is a very personal choice. I like wide angles. Really wide. The wider the better. But this also means distortion, something that in long-exposure photography can be quite useful. If I had to recommend one lens, I would say that something between 10mm and 35mm is quite useful when doing long exposure in nature (and even in the city). Again, a personal opinion.
3. Tripod
This is not a personal opinion, it is a must. Long exposure without tripods is almost impossible. You can try to find a rock/support to hold your camera, but in some situations, it is not possible. Investing in a tripod is a good idea, but if you like travelling light (like I do), it can be annoying to carry it everywhere. Oh, and in most airports, you will not be allowed to bring your tripod with you on the plane, you will have to check-in.
4. Filters
When someone tells me photography is an expensive hobby, I nod and think with all the filters I would like to buy. Filters are expensive, and some can be very situation-specific. Remember that you can combine them I would recommend at least 4 filters:
- A GOOD polarizer. If you plan on taking seascapes, lake reflections, … you will most certainly need it.
- A medium ND filter (between 3-6 stops): this will come handy for blue hours, sunsets, or situations with little light when you would like to lower your shutter speed.
- A 10stop ND filter: this little guy will allow you to do daylight long-exposure photography.
- A graduated ND filter: when the sky is very bright (shooting at the sun) and the foreground is dark, this will save your day.
5. Batteries:
shooting long exposures will drain your batteries faster than regular photography. The difference is quite noticeable. Buy as many batteries as you can, there are never too many batteries!
6. Remote shutter:
A handy way to avoid touching your camera when taking photos, removing any chance to get a blurry one. A cheap option is to set the 2-second timer in your camera.

Step-by-step first exposure experience:
1. Choose the location
You have all your gear, and you are ready to go for your first long-exposure shooting? Wait, where are you planning to go? Long exposure photography will give better results when there is movement in nature. First, think about what makes the location you have on mind unique. And then look at the weather forecast.
If it is overcast, and there is no wind, or if it is super sunny, and there are no clouds, don’t rely on the sky to help you make the photo unique. Low clouds and wind, or patches of sun and clouds are two optimal conditions for long-exposure photography. However, there are some other things that can be worth shooting for a long time exposure.
Lakes, reflections, rivers, waterfalls, and if it is already dark, light trails from cars, bikes,… there are endless opportunities, as long as there is movement, long-exposure photography makes sense.
2. Scout the area:
You are at your amazing location, the weather looks perfect, it is time to decide where you will take your image from. Unlike handheld photography, setting the tripod, choosing the right settings, adding filters,… requires some time, so don’t start opening your tripod.
Walk, try some framings, just with your camera, handheld, to see how it looks like. Will the light be in the right position when you take the photo? Will the sun or moon be on my image? Remember that they move, so it might ruin your photo. Choose one or two locations, and move to point 3.
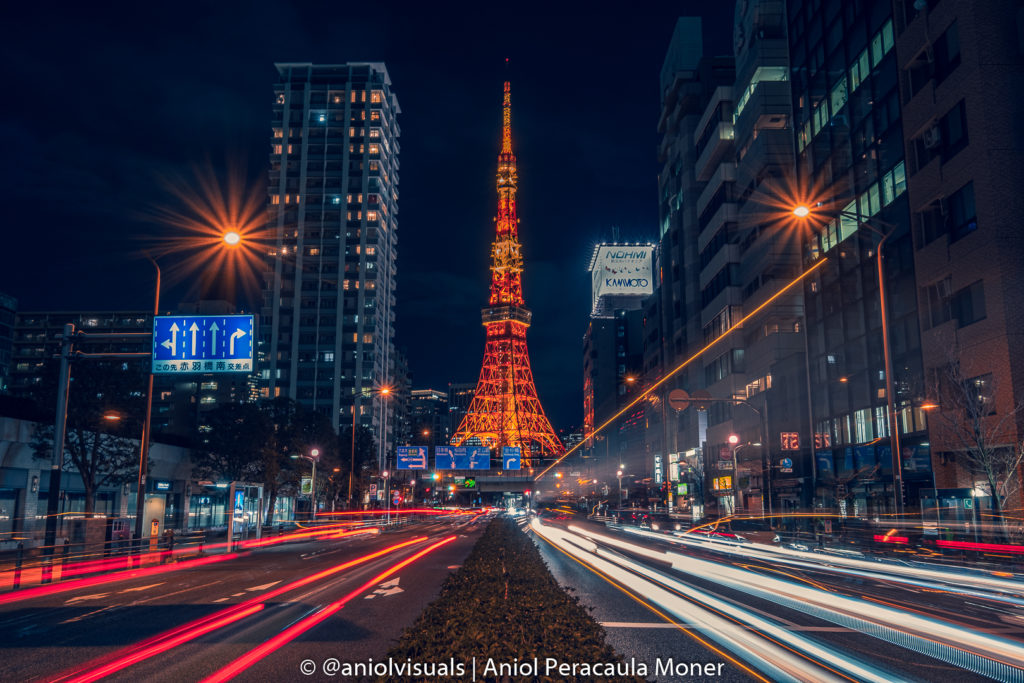
You can even scout the location online. It all depends on what you are trying to get, a specific image (like the one below), or just willing to explore a new area. For example, in the image below I used google maps to find the exact location to take this shot. Find more about it at my Tokyo night photography locations post.
3. Set the tripod:
Setting the tripod has become quite a routine for me. It means that I already have half the image. I know how it will look like. Now it is time to hope that nature (or the city) will help me with some tones, cars, or whatever you are capturing.
Make sure the tripod is in the right position, sturdy and that the wind or other elements are not moving it. There is nothing more annoying than taking a long exposure image and seeing that it is blurry. It might seem an obvious step, but it is essential to achieve good results.
4. Choose the right composition and settings:
Oh boy, how many mistakes I committed at this point… From shooting at F4 to not lowering the ISO… I am assuming you have basic knowledge of how to shoot in manual, what ISO, shutter speed, focal range, and others mean.
With the tripod set, adjust the horizon, decide whether you are shooting vertical or horizontal, and now turn your camera into manual and decide the settings. As in many other photography areas, the experience will make you succeed. Therefore, you have to try and fail. It is not the same if the wind is blowing hard or if there is almost no wind. It’s not the same to shoot inside the water, or from the top of a mountain.
First, adjust your focus. Focus the element or area of interest, and then turn the focus to manual. When you add the filters, sometimes the camera is not able to focus accurately.
Then, add the filter. I perfer adding the filters before deciding shooting speeds, although it is possible to calculate the shooting speed knowing the filter you will use.
Once the filter is added, make sure your F is in the right number (my sweet spot is around 8-9 so I try to keep it there), and decide your shutter speed. One thing that I had to learn is that it is always better to underexpose than to overexpose. I never shoot long exposures at what my camera tells me is a correct exposure, because they turn burned. Instead, choose a slightly underexposed setting, and work with it during postproduction.
In most situations, 30 seconds exposures will capture the movement of the clouds. If it is very windy, lowering the exposure around 20-25 seconds is quite likely to work. On the other side, if the wind is not blowing, maybe 1-2 minutes will be optimal to get some movement on the clouds.
Set the timer or the remote shutter, and get ready.
5. Take your long exposure photography
This is the last step of the long exposure photography guide. You made it! If you are in a rock or close to the tripod, try not to move, stay quiet and wait. Once you have the first result, start adjusting settings, adding or removing filters,… This is why it is very important to be at the location early, to have time to try, fail and be ready when the conditions are at its finest.
TIPS for Long Exposure Photography
Here you have some handy tips that I use whenever I go on a long-exposure mission.
- Wind: Depending on the wind direction, the clouds will move towards the elements of the image, or in a less optimal direction. Unless you can change your position, learn to live with the fact that sometimes the clouds don’t move in your desired direction
- Reflections: Imagine you are by a lake and some gentle wind is ruining a beautiful reflection. A long-exposure will most likely help to create the reflection, although not as clean as if the water was calm.
- Traffic lights: Long exposures create awesome car light trails unless you are in an area with many traffic lights. You will need to time your shooting very accurately to get a good shot. Try and experiment.
- Water: it is not always the best choice to set a super long exposure time for water. Try less than one-second exposure, you will get wilder images, and the power of water will be more present.
Hope you found my long exposure photography guide useful! If you want to see more of my long-exposure work or images from any other of my trips, visit my Instagram! If you have any question, or you want to use my photos, contact me via the contact form or at aniolvisuals@gmail.com